
Articles
Adhesives & Sealants
Technology
Through the Wrapper
Continuous insulation and its challenges for window installers.
February 25, 2021 By Andrew Snook
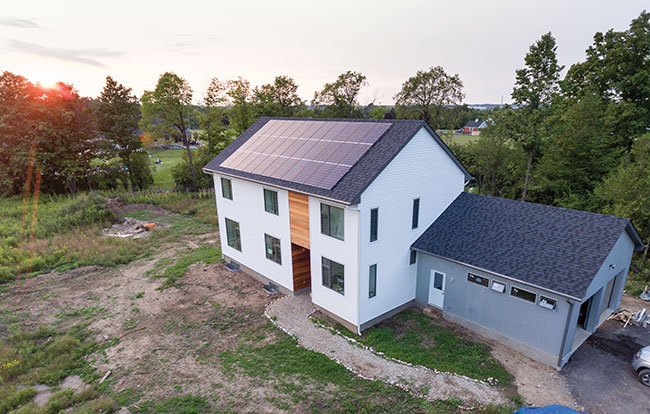 Cladding installed over deep exterior insulation cavity, with windows protruding to the same plane by means of structural buck extensions. Photo credit: Brett Forsyth Photography
 It’s no secret that energy efficiency requirements for low-rise and high-rise construction are becoming greater and will only continue to do so. One of the ways builders are meeting higher R-value demands is through the use of continuous insulation.
Why continuous insulation? Well, according to George Torok, facade specialist at Morrison Hershfield, there are two reasons for choosing continuous insulation. The first is that it just makes sense.
“Typically, in low-rise, you’re using wood frame construction still – sometimes steel frame. And, traditionally, the frame elements have bridged from the inside surface of the walls to the outside surface of the walls. So, on the inside you would have the poly and the drywall, and, on the outside, you have sheathing and moisture barrier and the cladding materials. So, the studs – whether they’re wood or metal – are thermal bridges. They’re very much more conductive than the insulation material between the studs. It’s an old issue,” Torok explains, adding that it was recognized as an issue by the folks at the National Research Council. “It degrades the heat loss through the studs, effectively reducing the insulation value provided by the insulation between the studs. So, you might look at a traditional two-foot by four-foot wall where you would have R12 as an exterior insulation, but when you count into the effect of the studs then you’re reducing the effective value of that insulation. So, the term you often hear today is ‘effective R-value’ of a wall or ‘effective U-value’ of a fenestration assembly.”
The terms effective R-value and U-value recognize that some components of a wall system or fenestration system are more conductive than others.
“Therefore, when you look at the whole, your actual R-value or U-value is higher or lower than you would expect from a traditional analysis,” Torok says.
Builders counter this issue by placing insulation across the exterior of a structural wall assembly, which can be performed by placing insulation on the outside of the exterior sheathing and having the cladding beyond that. Or, instead of putting the sheathing in place – in the case of a house that would typically be OSB across the outside of the house – you can put rigid insulation material directly against the outside of the studs, such as extruded polystyrene or expanded polystyrene, Torok explains. He adds that it reduces the amount of heat loss to the studs and recovers some of the lost value of the insulation from in between the studs.
“It’s a smart move in terms of trying to increase the thermal performance of the envelope,” he says. “It’s a requirement of code these days. In Ontario, we have the supplementary standard SB-12 to the Ontario Building Codes which gives a number of compliance packages. To me, they’re energy performance targets for the exterior wall. Typically, they require insulation across the exterior of the stud frame to reduce thermal bridging.”
Torok says that a similar issue occurs in high-rise construction.
“A lot of apartment buildings we typically build with reinforced concrete frames. There are, of course, the newer wood frame construction technique as well. And you can build with steel and composite steel and concrete frames. That creates a grid work of structure you have to infill between the floors and vertical elements like columns and sheer walls to create the exterior walls. That’s typically done, again, with a [steel] stud assembly,” he says. “But if you have steel stud that spans from the interior drywall to the interior sheathing with no insulation on the outside of it, you have thermal bridges for that stud frame and that degrades the value of the insulation you put within the stud cavities. So, to meet energy performance targets, you need to insulate on the outside of the stud frame and on the outside of the building structure – the concrete frame or whatever has been used to make up the structure of the building. And again, that is picked up again in the Ontario supplementary standard SB-10, where continuous insulation is typically required within the exterior walls. So, it’s a combination of good building science that’s been translated into legislation in the form of building code requirements.”
The use of continuous insulation isn’t new – builders have been using it for more than two decades – but its popularity has been trending upwards. Once thought of as a more niche product for meeting energy efficiency requirements for green building, continuous insulation is now becoming a more regularly used tool in the belts of industry professionals.
Ben Polley, president of Evolve Builders Group based out of Guelph, Ont., says that there has been a significant increase in demand for energy efficient homes both from an economic and an environmental perspective.
“There’s big interest in ultra-performing homes. It’s just completely on a different scale now,” he says. “People want you to build something they understand will be favourable for their pocketbooks and to the next generation for not doing more harm [to the environment].”
James Higgins, associate building science technologist for RDH Building Science in Burnaby, B.C., says emerging technologies have played a role in the upward trend in the use of continuous insulation.
“There has been emerging technology for rigid insulation layers and cladding attachments through these rigid layers, so we have the ability to add a scalable amount of insulation depending on the needs of the building. We’ve seen up to eight to 12 inches of exterior insulation,” he says. “It’s an efficient way to insulate the walls and other areas of the building as well. That’s why we see that trend and we’re seeing it all over.”
Higgins adds that he likes the trend towards increased use of continuous insulation because it will aid builders in the future.
“I like it because, here in 2021, we’re making sure we can install it properly and we’ve got the right detailing. But it’s scalable for 2030 and 2040 when, if things continue, we will have even more insulation or be ready for what people call ‘future-proofing’ these assemblies. We’re not having to re-invent the insulation approach every time energy requirements increase or change,” he says. “It’s also a pretty elegant solution where we have this dedicated layer. You have to add a few more components to make sure you attach the cladding on the outside properly. It’s a pretty cool way to insulate the wall, for sure.”
Challenges
Torok says the challenges for using continuous insulation for window installations are often the same for high-rise and low-rise construction.
“As you push the window further to the outside, you create a dead air pocket over the inside face of the window. That dead air pocket can become cooler and you increase the likelihood of condensation,” he says. “When we introduce insulating sheathing on the outside of a wall assembly, the problem is the window is so much narrower than the overall wall that if you keep that window close to the inside surface, then there are going to be other elements of the wall framing that are protecting beyond the window. Those can act as thermal bridges.”
Torok says that ensuring the window is properly supported is a big challenge when pushing the window further outward.
“When you push it further outward, some of the window is going to be sitting over some of the exterior insulation. So how do you now support the weight of the window and how do you anchor it back to the actual structural frame?”
Over time, industry professionals have developed a few different approaches. In high-rise construction, where there is a steel stud frame, people often line the steel stud opening with plywood that is three quarters of an inch or thicker, according to Torok.
“The plywood protects beyond the outside base of the stud and the surrounding sheathing as far as it needs to, to support the window. That allows the window to be slid further outward. The window is typically anchored directly into the plywood, and that plywood is anchored into the stud. So, you have an indirect load transfer in terms of wind load, structural load from window to plywood to stud frame, and then on into the building structure. The plywood is typically covered on the exterior underneath the window with a peel-and-stick membrane… the idea there is that the membrane waterproofs the plywood, so if there’s any water that might get into the exterior insulation, then the wood is protected.”
Torok says that plywood is also used sometimes in low-rise residential. Another approach is simply to add a picture frame of dimensional lumber around the outside – for instance, a two-by-three-foot frame added to the wall to outline the window opening. This would also be covered by membrane.
“The window would be set into the opening generally above that lumber frame and then the membrane would be brought in over the wood and sealed to the inside perimeter of the window. Then the exterior would be sealed to the water-resistance barrier and the surrounding wall assembly,” he says.
Another option is using one of the many liquid-applied products available in the marketplace.
“They essentially come in a caulking tube and you spread them out over the wood frame in a way sort of like a paint,” Torok says. “You have to achieve a certain thickness, so you could use a thickness gauge to measure it and even still need to seal that membrane with a caulking material usually to the inside perimeter of the frame, and that liquid-applied material would be travelled onto the surrounding water-resistant barrier.”
Rigid insulation can also be used for low-rise residential applications.
“If you’re using a rigid installation, like extruded polystyrene, and the window incorporates a perimeter mounting flange or nail flange, then it’s possible to nail directly from the flange through the extruded polystyrene directly into the frame. And then you still have to apply a water-resistant barrier around the window opening,” Torok says, adding that this is a proprietary solution and that the insulation manufacturer would need to approve its use. “You wouldn’t want the insulation to sag or move downwards.”
Polley’s company, Evolve Builders Group, has been working with continuous insulation in various forms for around 15 years, including rigid insulation. He warns that if the installer is using metal fasteners it can destroy the added R-value they are trying to achieve.
“If when installing continuous insulation – which is commonly 1.5-inch rigid polystyrene – that insulation is installed with a series of metal screws or metal nails, then there’s a real question as to whether or not a significant benefit has been gained; given that screws, for example, depending on the metal of which they’re made, can have a conductivity of thousands of times more than the surrounding insulation,” he says. “Each one of those screws might have a diameter of 3/16 inches, but it’s actually like the equivalent of three inches or four inches of a hole in that insulation because of how conductive that metal is. It’s not unlike taking a hole saw and drilling a bunch of holes in the insulation. That’s how it’s going to perform.”
Polley says the same issue exists for the window installation.
“If we build out a significant wooden frame to suspend or to support the window that is now breaking up the so-called continuous insulation, then we’re doing the same thing. It won’t be worse than building conventionally, but there’s the risk that we’re doing something that has limited benefit.”
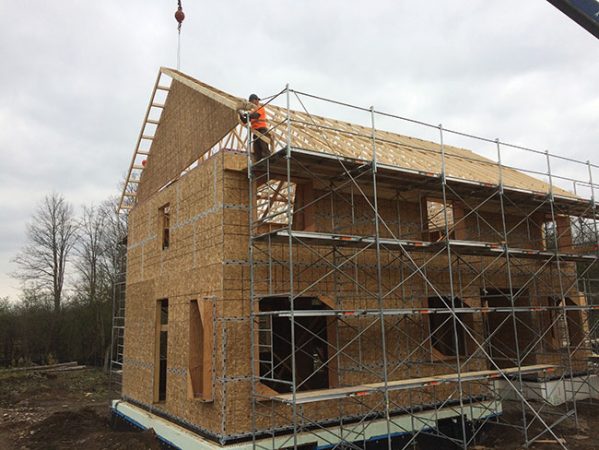
Deep plywood window buck extension to the exterior of ordinary exterior wall OSB structural sheathing. Specialty flashing tape and caulk ensure continuity of vapour control and air barrier layers as the buck protrudes into the insulated exterior cavity. Credit: Evolve Builders Group
Tips
Polley offered installation tips from both a design and construction perspective.
From the design perspective, he says to never rely on anecdote when it comes to your construction details. Get them tested.
“I generally only use construction details that have been energy modelled. They have been tested on a computer to give me an understanding of what is the holistic impact of all of the parts I want to put together,” he says. “An energy model will reveal to me if I’m exploring, or our team is exploring, a different product or a different method to install the window or how to connect the window to the installation. It will tell us what the real-world outcome would be of that.”
When it comes to the construction side of things, Polley says that it doesn’t take his company a great deal more time to construct in this fashion rather than at a “code minimum manner.”
“But it does require a re-thinking or upgraded training for the people in the field,” he says. “The difficulty with construction – unlike manufacturing where everything is under one roof and you can holistically make a change that affects other departments – is here you might have a fenestration contractor, a framing contractor, an insulation contractor, a siding contractor and probably more. There are multiple trades who are potentially going to touch some part or detail in any window opening.”
Polley says that if you don’t or can’t train and control all those forces, then you may not get the results you were looking for.
“You might have all the best intentions, but you may not get the intended result,” he says. “It wouldn’t take much for somebody to throw an extra several screws because that’s just what we do in order to make sure it doesn’t break, or it doesn’t fail. But in fact, by so doing, it might be that’s the thing that has short-circuited all the efforts that everybody else made.”
Seal of approval
Special effort needs to be made to seal up the junction between the casement and the insulation, according to Polley. He says there are a variety of methods and products that can be used to address this issue.
One common method to close off that junction has been canned spray foam. It is purposely overfilled, so the contractor is ensured that they have enough, and then they cut off the excess. Polley says this is far from an ideal solution.
“Anybody who does that will recognize that when you cut off that outside film, you’ll expose a whole bunch of little bubbles. Even before having done that, it happens that canned spray foam is not as airtight as we’ve come to understand it to be. And we render it even less so when we cut off that outside fill, which is a little more closed,” he says. “Having learned that and observed that through blower door tests, what we have determined that on its own it is insufficient if you’re looking for a complete air seal.”
However, Polley says there are a number of products on the market that can be added to ensure you have an air seal. One of them is hinge tape.
“Hinge tape is basically a type of tape that has a sticky surface on about half of one side matched with a sticky surface on its opposite face for the other half of its width. What you can do with that, is you can adhere one side to the outside edge of your window frame, and then bend it 90 degrees and put the other face to your wood frame or continuous insulation. This provides a secondary, or sometimes primary, line of defence for air tightness; that when combined with canned spray foam, can provide real air tightness in an application such as this.”
Another product option is expanding foam cakes.
“The expanding foam cake basically looks like a type of foam weather stripping, but it starts out off the roll really flat, really, really low profile,” Polley says. “What you would do instead of spray foam or – in some cases, caulking – you will apply this around the inside of your rough window frame opening and then insert the window. Just like canned spray foam, this foam tape will expand until it closes the whole opening. What’s great about it is that the foam cakes for these applications are UV stable. They don’t degrade when exposed to sunlight, which canned spray foam does. And windows can often be exposed from the outside for months before the cladding is on. They’re airtight and they’re water tight. But, once again, they’re different from what we’re accustomed to. So, it relies on some re-training and orders of operation.”
Insulated sill extensions are another option. “These are basically a really dense foam surrounded by polyurethane or fibreglass core that are nailed onto the top inside face of a window opening but extend. It’s almost like taking the two-by-six-foot frame wall and extending it another couple of inches out towards the exterior of the house. But it doesn’t need any support from below. It’s a cantilever. This is another example of a situation-based product that’s been developed wholly to deal with the continuous insulation need to support windows,” Polley says.
Helpful guide
A good source for information related to continuous insulation is the BC Hydro Thermal Bridge Guide, which is a free download that can be found at the BC Hydro website.
Print this page
Leave a Reply